Showing posts with label WCF. Show all posts

I recently worked on a project where I developed an WCF web services that is exposed via  https and net.tcp. The web services does all the database calls and business logic. Here are some lessons or tips for developing in WCF with net.tcp.

When I use the net.tcp channel to communicate to the web service I often get the following error:

The socket connection was aborted. This could be caused by an error processing your message or a receive timeout being exceeded by the remote host, or an underlying network resource issue. Local socket timeout was '00:01:00'.

This is the default error message that you will get from WCF if something went wrong but the WCF channel does not know exactly what error occurred.

What to do when you receive this message.

  1. Increase the ReceiveTimeout and SendTimeout on the binding that is used by your web service to 5 min. The other timeout properties default values are 99.9% always correct. The 5 min is very big and will usually eliminate actual timeout issues.
  2. The usual suspects for the error is MaxBufferSize, MaxBufferPoolSize, MaxReceivedMessageSize, MaxArrayLength default size (65536) is to small. Increase them by adding a 0 at the end (655360) to see if the error disappear. Then by small increments reduce the size to find the correct value.
  3. If your web service method returns an big message or generic array or list with a big items count and big object graph you have to increase the value of the property MaxItemsInObjectGraph in the dataContractSerializer element. You need to create a Service Behaviour (Service side) and Endpoint Behaviour (Client side) with the dataContractSerializer element. You will then see the MaxItemsInObjectGraph property.
  4. To increase your communication between service and client you can switch the TransferMode in the binding from Buffered to Streamed.
  5. When you call the web service from an .Net client please avoid calling your code inside a using statement. Rather use try-finally where you can call close on the client object and if the communication channel faulted you can call abort on the client object.

These lessons will hopefully make your net.tcp development experience easier. If you have any further tips or lessons please leave a comment.

Cheerio!

Here is my talk that I presented at Devs4Devs. Thanks to Microsoft for the opportunity and thanks to the guys who attended.

At the bottom is the links to my presentation and sample code. Before you can use the sample you need to setup Windows Server AppFabric Cache and use the AdventureWorks Database.

Another note that the web service gets deployed to IIS when you build the project.

Here the links:

AdventureWorks Database

http://msftdbprodsamples.codeplex.com/

Sample Application

http://dl.dropbox.com/u/4406115/Devs4Devs%202011/AdventureService.zip

Presentation Slides

http://dl.dropbox.com/u/4406115/Devs4Devs%202011/WCF%20AppFabric%20Cache.pptx

Any feedback or questions are welcomed. Until the next talk!

Today I want to show you how to develop an authentication system with JSON using ASP .Net MVC 3.0 and WCF.
Firstly I want to discuss the system design. I’m using Asp .Net MVC 3.0 framework to publish Html views to the client browser and for defining pretty URLs in the project. There is no business logic in the MVC framework. I define all my business rules in an WCF Service that only respond to JSON requests.  I’m using JQuery from my Html pages to query the web services for my business data.
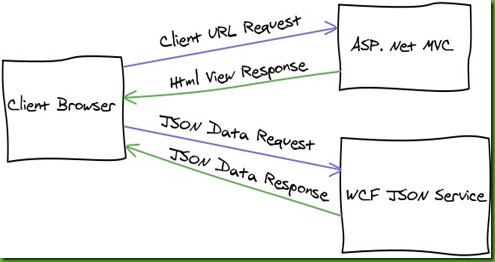
Asp MVC WCF Json Design
You might ask yourself why I would decide on this design?
Benefits:
  • Clear separation of concern.
  • Smaller request and response data transfers.
  • Very Scalable  System ( Quickly move web services to Windows Azure ).
  • Dynamic Html Views Design.
Negatives:
  • JSON data is plain text.
  • Require SSL for secure and encrypted data transfer.
I hope you understand the benefits and negatives. There are more benefits and negatives that can be added. SSL is very important to be enabled when using this approach for authentication. Otherwise the user’s password will be available when transferred to the server.
Authentication Code Example:
Download the code to follow: JQueryLogin.zip
I created the default Asp .Net MVC 3.0 project with unit test project included. For this blog I did not do any unit testing. A nice challenge for you! In the solution there are three projects. JqueryLogin project, is the MVC web project. JqueryLogin.WebService project, is the WCF service that will handle JSON requests and business logic. JqueryLogin.Contracts project, is the WCF contracts that is defined for each request and response.
In the MVC web project I use the Razor View Engine. I also clean-up the code to just provide Views with no logic in the controllers. Especially go and look at the AccountController. I did not touch any views that is created by the template. Also I added the necessary JavaScript files that is required to do Ajax requests and create dynamic Html views.
In the _Layout.cshtml I added a bit of special JavaScript resolve function to help resolve URLs in my other JavaScript files. I got the original code from another blog (Forgot where?) but fixed it for MVC 3.0.
<script type="text/javascript">
    Url = function () { }

    Url.prototype =
        {
            _relativeRoot: "@Url.Content("~/")",

            resolve: function (relative) {
                var resolved = relative;
                if (relative.charAt(0) == '~') resolved = this._relativeRoot + relative.substring(2);
                return resolved;
            }
        }

    $Url = new Url();
</script>

With this function I will be able to resolve URLs like this in JavaScript:
window.location.href = $Url.resolve("~/Home/Index");

Now lets look at the other JavaScript files. The file ajax.js has some infrastructure and setup code that will help me with the requests to the web service. The User.js file is where the main logic is to register, sign-in and sign-out users to the web application. 

At the top of the file I define two object Register and SignIn with properties that match the same properties as the RegisterRequest Contract and SignInRequest Contract. The code that follow is where I define where the web service is that needs to be called. The web service methods are called after the Html form pass validation on the submit. Here is the code for sign-in and sign-out of the user:
/// <reference path="jquery-1.4.1.js" />
/// <reference path="jquery.validate.min.js" />
/// <reference path="ajax.js" />

var SignIn = {
    UserName : '',
    Password : '',
    RememberMe: ''
};

var UserServiceURL = "../WebService/UserService.svc/";
var UserServiceProxy = new serviceProxy(UserServiceURL);

$(document).ready(function () {
    $("#loginForm").validate({ submitHandler: function (form) {
        SignInUser();
    }
    });

    $('a[href="/Account/LogOff"]').click(function () {
        SignOutUser();

        return false;
    });

});

function SignInUser() {
    blockDisplay();
    var request = BuildSignInRequest();

    UserServiceProxy.invoke({
        serviceMethod: "SignIn",
        data: { request: request },
        callback: function (response) {
            $('#status').empty().html("<strong>Success: " + response.Message + "</strong>");

            $.unblockUI();
            window.location.href = $Url.resolve("~/Home/Index");       
        },
        error: function (xhr, errorMsg, thrown) {
            OnPageError(xhr, errorMsg, thrown);

            $.unblockUI();
        }
    });

    return false;
}

function SignOutUser() {
    blockDisplay();

    UserServiceProxy.invoke({
        serviceMethod: "SignOut",
        data: null,
        callback: function (response) {
            $('#status').empty().html("<strong>Success: " + response.Message + "</strong>");

            $.unblockUI();
            window.location.href = $Url.resolve("~/Home/Index");       
        },
        error: function (xhr, errorMsg, thrown) {
            OnPageError(xhr, errorMsg, thrown);

            $.unblockUI();
        }
    });

    return false;
}

function BuildSignInRequest() {
    SignIn.UserName = $('input[name="UserName"]').val();
    SignIn.Password = $('input[name="Password"]').val();
    SignIn.RememberMe = $('input[name="RememberMe"]').val();

    if (SignIn.RememberMe === "on") {
        SignIn.RememberMe = true;
    }
    else {
        SignIn.RememberMe = false;
    }

    return SignIn;
}

WCF Web Service Setup

Now let look at the web service to get all of this working. Firstly you define you web service in an interface file like IUserService.cs. In the UserService.svc mark up you have to change the factory to be able to handle JSON requests and responses.
<%@ ServiceHost Language="C#" Service="JqueryLogin.WebService.Service.UserService" Factory="System.ServiceModel.Activation.WebScriptServiceHostFactory" %>

In the UserService implementation you have to set AspNetCompatibilityRequirements attribute. This will allow for cookies to be set for when the user is authenticated.
[ServiceBehavior(IncludeExceptionDetailInFaults = true)]
[AspNetCompatibilityRequirements(RequirementsMode = AspNetCompatibilityRequirementsMode.Required)]
public class UserService : IUserService
{
    // Implementation Code
}

The implementation of the user authentication can be found in the AccountMembershipManager class and the FormsAuthenticationManager class.  The last part that is required for the service is the service binding. For this service I use wsHttpBinding.
<services>
  <service behaviorConfiguration="DefaultBehavior" name="UserService">
    <endpoint binding="wsHttpBinding" contract="JqueryLogin.WebService.IUserService" />
    <endpoint address="mex" binding="mexHttpBinding" contract="IMetadataExchange" />
  </service>
</services>

Show Some Results

I use Chrome Browser for debugging. I will show you the traced request and response output for Sign-in and Sign-out of user. I underline in red in the images the important details to notice.

SignIn Request – Click to Enlarge

SignInRequest

SignIn Response – Click to Enlarge

SignInResponseContent


SignOut Request – Click to Enlarge

SignOutRequest

SignOut Response – Click to Enlarge

SignOutResponseContent

Summary

The original idea of using JSON and WCF for creating a responsive website came when I read Chris Love blog entries “Creating a WCF Service for JSON” and “WCF and JQuery Using JSON”. The original JavaScript infrastructure come from him. As you can see that JSON allow for speedy web development and responsive web pages. JQuery just make it so easy to create Ajax calls.

Hope you enjoy this entry and any feedback or questions are welcome.

Cheerio!

What a challenge I had to try and create unit tests for workflows that is hosted by WCF services. This challenges took me an month to investigate and solve.

So, here I will explain and give code to show you how to do proper unit testing. I'm going under the assumption that you do know how to hook up a Workflow with WCF service. Otherwise just follow the code in the example project and you will quickly get it.

This post will show the basics first and later I will provide more posts of how to write unit test for different scenarios with ReceiveActivity and SendActivity.

First off, I created a simple project to illustrate the scenario to create a client object and post it to a service that has a workflow. The workflow is very basic that it will receive the Client object message and save it to a database. I will just fake the actually writing to the database.

The project structure:


Firstly we define the ServiceContract IClientService and hook it up to the workflow CreateClientWorkflow.xoml ReceiveActivity.


Next I created a custom WorkflowServiceHostFactory that I will explain later in another post. I removed the code behind for the ClientService.svc and made the following changes.
   1: <%@ ServiceHost Service="ClientWorkflowLibrary.CreateClientWorkflow, ClientWorkflowLibrary, Version=1.0.0.0, Culture=neutral"
   2:                 Factory="CommonLibrary.WorkflowServiceHostFactory, CommonLibrary, Version=1.0.0.0, Culture=neutral"  %>
This basically show some of the key setup points. Now for the main topic namely the Unit Test. The one unit test is straight forward that you start you service and create a service reference and use a client proxy to communicate with the service, but that is more of an integration test. I will show know the correct way to test your workflow service.
The Proper Unit Test Code
   1: [TestMethod]
   2: [Description("Run Unit Test with Administrator privlidges. (VS in Administrator mode)")]
   3: public void CreateClientWorflow_ReceiveCreateClient_ReturnClientWidthValidGuid()
   4: {
   5:     // Arrange
   6:     Client requestClient = new Client
   7:                                {
   8:                                    Id = Guid.Empty,
   9:                                    Name = "User",
  10:                                    Surname = "Nobody"
  11:                                };
  12:     Client responseClient = null;
  13:  
  14:     // Setup WCF and WF
  15:     Uri baseAddress = new Uri("http://127.0.0.1:8999/UnitTestHosting");
  16:     WorkflowServiceHost host = new WorkflowServiceHost(typeof(CreateClientWorkflow), baseAddress);
  17:  
  18:     host.AddServiceEndpoint(typeof(IClientService), new WSHttpContextBinding(), "CreateClient");
  19:  
  20:     ServiceMetadataBehavior smb = new ServiceMetadataBehavior { HttpGetEnabled = true };
  21:     host.Description.Behaviors.Add(smb);
  22:  
  23:     // Add Custom Services to Workflow runtime
  24:     WorkflowRuntimeBehavior runtime = host.Description.Behaviors.Find();
  25:     runtime.WorkflowRuntime.AddService(new ClientRepository());
  26:  
  27:     // To enable Workflow Tracking and Persistence
  28:     //string connectionString = "Data Source=(local);Initial Catalog=Workflow;Integrated Security=true";
  29:     //runtime.WorkflowRuntime.AddService(new SqlTrackingService(connectionString));
  30:     //runtime.WorkflowRuntime.AddService(new SqlWorkflowPersistenceService(connectionString));
  31:     
  32:     // Act
  33:     try
  34:     {
  35:         host.Open();
  36:         EndpointAddress address = new EndpointAddress("http://127.0.0.1:8999/UnitTestHosting/CreateClient");
  37:         IClientService service = ChannelFactory.CreateChannel(new WSHttpContextBinding(), address);
  38:  
  39:         responseClient = service.CreateClient(requestClient);
  40:  
  41:         host.Close();
  42:     }
  43:     catch (Exception e)
  44:     {
  45:         Assert.Fail(string.Format("Error: {0}", e));
  46:     }
  47:     finally
  48:     {
  49:         if (host.State != CommunicationState.Closed)
  50:         {
  51:             host.Abort();
  52:         }
  53:     }
  54:  
  55:     // Assert
  56:     Assert.IsNotNull(responseClient);
  57:     Assert.AreNotEqual(Guid.Empty, responseClient.Id);
  58:     Assert.AreEqual(requestClient.Name, responseClient.Name);
  59:     Assert.AreEqual(requestClient.Surname, responseClient.Surname);
  60: }
To be able to run this code you need Administrator privileges. I follow the AAA syntax in unit testing. The Arrange part is where I setup my requestClient object and the WCF and Workflow configuration.

Firstly you setup the Uri address of where you want to host the service that will be dynamically get set as the unit test is run. Then you create the WorkflowServiceHost and assign the workflow that you want to test. Add an Service endpoint with the ServiceContact that is used in the workflow and the appropriate binding that should be used. Finally a name for the endpoint that you will call later to test.

You can add additional behaviour metadata. When you instantiate a WorkflowServiceHost then the WorkflowRuntimeBehaviour is automatically added. In the code I do a find on the host Behaviours to return the WorkflowRuntimeBehaviour instance. This instance is required to add additional custom service. For example the ClientRepository.You will see the code comment if you would like to add Tracking and Persistence to you workflow under test.

Now for the Act part. With WorkflowServiceHost setup we can open a connection to the service. I create a channel to the ServiceContract IClientService and assign the endpoint address that should be queried.
I call the relevant method on the ServiceContract and close the host connection afterwards. 
There is a catch and finally section to make sure that no exceptions was raised and that the host was properly closed.

The Assert part is at the end to separate the asserts from any communication problems. I specify multiple asserts just to show the variety of unit tests that could be written and should actually be written to different unit tests.

Hope you enjoy this post and any feedback or recommendation is welcome!

Cheerio!

Source: ClientService 1.zip

Today I would just like to show how to correctly write the code when using a WCF client proxy to call an WCF service.

Firstly you have to create a Service Reference to the service so that the relevant code is generated for the client proxy.

Here is the correct code:
   1: ProductClient client = new ProductClient();
   2: try
   3: {             
   4:    client.Open();
   5:    client.UpdatePrice(10, 100.50);
   6:    client.Close();
   7: }
   8: catch (Exception e)
   9: {
  10:    Assert.Fail(e.Message);
  11: }
  12: finally
  13: {
  14:    if (client.State != CommunicationState.Closed)
  15:    {
  16:       client.Abort();
  17:    }
  18: }

As you can see I first create the ProductClient proxy object and call open. Then the relevant Web method and then close the client proxy channel.

Then I create a catch section to display the relevant details. In the code above I use Assert.Fail() because this code is used in a unit test, but you can but logging in or any other exception handling logic.

The finally section is there to check if the channel has closed successfully otherwise will call abort on the channel. This allows the correct exception details been catch if an exception is raised in the web method or when the channel is closed.

Here is the wrong code (The popular approach):

   1: using(ProductClient client = new ProductClient())
   2: {

   3:     client.UpdatePrice(10, 100.50);
   4: }


So what is wrong with this? Well the problem is that if an exception is raised in the web method UpdatePrice() and an exception is raised in the Close() method of the client proxy channel is closed by the using() statement then the close exception would hide the original exception that is raised by the web method UpdatePrice().

The first code snippet is much clearer and show what really is happening if an exception should be raised. Where the using does make the code smaller and handle the open closing of the client proxy, but could hide the specific details of the original exception.


Cheerio!

Disqus